The Cat Is Out of the Bag: AI and the Human Experience
Artificial intelligence is no longer a distant possibility—it has become part of everyday life. Like agriculture, industrialization, and nuclear physics, AI can be seen as a watershed moment: a development that may change how society functions in ways that are unknown and difficult to reverse. The toothpaste, in a sense, is out of the tube.
Perspectives on AI
AI inspires a range of responses and attitudes, which can vary based on personal experience, professional context, or philosophical perspective:
- Cautious / Concerned: Some view AI primarily as a source of disruption or uncertainty. Concerns may include ethical dilemmas, shifts in work, or questions of control and autonomy. Careful observation and reflection often guide their engagement.
- Skeptical / Pragmatic: Others recognize AI’s potential but engage selectively, weighing benefits against risks. For them, AI is a tool—powerful, yet requiring thoughtful integration into daily life.
- Neutral / Observational: Some neither embrace nor resist AI. They notice its presence and influence, adapting as necessary, without seeing it as profoundly transformative in their routines.
- Optimistic / Exploratory: This perspective emphasizes AI’s potential to amplify human capabilities. Opportunities for collaboration, efficiency, creativity, and insight come to the fore, while reflection guides how and where AI is applied.
- Visionary / Deep Integration: At the far end are those imagining a future where AI expands problem-solving and cognition beyond what humans could achieve alone. They explore adoption experimentally, with curiosity and imagination leading the way.
What Comes Next
The future invites reflection on how humans and AI interact. People in all professions and of all interests can find AI assistants useful for exploring ideas, amplifying productivity, and uncovering insights that were previously difficult to access.
Opportunities arise in curiosity and discernment: learning how to interact with AI to explore possibilities and apply human judgment, and noticing how these tools shift the ways we work, create, and decide. Opportunities exist in shaping how society works while facilitating the pursuit of personal fulfillment.
Even as AI expands what is possible, human insight, empathy, and values continue to shape choices. The emphasis is not on adopting AI unreservedly, but on approaching it thoughtfully and reflectively, allowing it to illuminate rather than define human potential.
Conclusion
AI represents a watershed moment in human history, with its long-term effects only beginning to unfold. Beyond practical considerations, individuals may find value in contemplating the existential questions it raises—how AI is integrated into life, how it shapes choices, and what responsibilities come with creating intelligence that complements and extends human capabilities. Engaging with these questions may influence not just productivity and society, but the ongoing experience of being human in an AI-infused world.
FreeBSD Bootonly ISO failures PXE booting under UEFI
FreeBSD Bootonly ISO failures PXE booting under UEFI
The image below illustrates an error observed on some hardware platforms that fail to PXE boot FreeBSD’s bootonly ISO under UEFI. The failure occurs in mountroot() and manifests as an error 19 reportedly meaning the media cannot be located. This has been observed with 10.3, 11.1, and 11.2.

mountroot() error 19
One can workaround this problem by deploying a bootonly ISO configured with an MFS_IMAGE. EFI_STAGING_SIZE may need adjusting to accommodate larger objects; It defaults to 64. EFI_STAGING_SIZE can be defined within make.conf, release.conf, or on the command line. While not illustrated below, EFI_STAGING_SIZE is implicitly defined specifying a make.conf that includes the knob in the environment via MAKE_CONF.
MFS_IMAGE is necessary because the project’s bootonly ISO fails to PXE boot at mountroot() w/ error 19 indicating the boot media cannot be located. MFS_IMAGE implies a MD_ROOT root filesystem. The build system doesn’t seem to provide a mechanism to build a default MFS_IMAGE and is therefore done outside the context of a build.
The following procedure builds a binary distribution from the source tree in it’s default form (including the default bootonly.iso). It rebuilds the bootonly.iso after generating a root partition and MDROOT kernel.
# Create CHROOTDIR w/ GENERIC kernel (also builds binary release)
root # cd ~/projects/freebsd
root # git checkout releng/11.2
root # release/release.sh -c release/release.conf

# Create root.part from ${OBJDIR} bootonly
root # cd ${CHROOTDIR}/usr/obj/usr/src/release
root # rm bootonly/boot/kernel/kernel
root # rm bootonly/boot/geom_md.ko
root # echo "/dev/ufs/FreeBSD_Install / ufs rw 0 0" > bootonly/etc/fstab
root # makefs -B little -o label=FreeBSD_Install root.part bootonly/
root # cd .. && mkdir -p sys/MDROOT
root # mv release/root.part sys/MDROOT/

# Build MDROOT kernel
root # cat ${CHROOTDIR}/usr/src/sys/amd64/conf/MDROOT
include GENERIC
ident MDROOT

makeoptions     MFS_IMAGE=root.part
root # eval chroot ${CHROOTDIR} env KERNCONF=MDROOT make \
    -C /usr/src buildkernel

# Build bootonly ISO w MDROOT kernel
root # mount -t devfs devs ${CHROOTDIR}/dev
root # chflags -R noschg ${CHROOTDIR}/usr/obj/usr/src/release/bootonly && \
    rm -rf ${CHROOTDIR}/usr/obj/usr/src/bootonly
root # eval chroot ${CHROOTDIR} env KERNCONF=MDROOT \
    NOPKG=1 NOSRC=1 NODOC=1 NOPORTS=1 make -C /usr/src/release bootonly.iso
The Known Costs of Security Embargoes
The Known Costs of Security Embargoes
 A security embargo is an agreement between parties, typically a vendor and interested parties. The interested parties are generally individual(s) or organization(s) that discovered a security vulnerability in a vendor product. Security embargoes are not limited to two parties and may include multiple vendors and/or other stakeholders. Parties to an embargo generally agree to withhold disclosure of a security vulnerability until a mutually agreed upon date, which is often a date the vendor will publish patches.
Security embargoes primarily provide vendors time to research and patch vulnerabilities prior to public disclosure and limit the risk a malactor may exploit such a vulnerability before patches are available.
In February 2017, Mitre assigned CVEs to Intel for each of the vulnerabilities we now know as Meltdown and Spectre, CVE-2017-5715, 2017-5723, and 2017-5754. There exists ambiguity in the timeline of events surrounding disclosures. For example, The Guardian indicated Google disclosures were made to Intel in June and July 2017 while The Verge indicated December 2017. What is known as fact, however, is that the public was generally unaware until Google’s announcement on January 3, 2018, almost a week prior to the agreed upon disclosure date of January 9. In fact, Intel’s disclosure of Meltdown-Spectre is coming under increasing scrutiny after The Wall Street Journal on January 28 reported that Intel had made disclosures to Chinese organizations prior to notifying US authorities.
Also known is that Alex Ionescu publicly posted about a Microsoft work-in-progress that is suggestive that Microsoft and some Linux related project(s) were aware of the vulnerabilities in November 2017 and likely before.
Meanwhile, researchers were beginning to investigate — and ultimately exploited — these vulnerabilities disclosing them to Intel over a period of months. It follows that organizations who disclosed their findings to Intel likely became party to a security embargo at that time.
While the timeline is debatable, it’s suggestive that work to mitigate these vulnerabilities was in high gear as early (likely earlier) as September 2017 particularly with Microsoft and some Linux contingent, as alluded to earlier.
Despite the lack of clarity surrounding the disclosures, it is a fact that the FreeBSD project was not aware until late December 2017 while other BSD projects received no advance notice. This should have been disclosed to the BSD operating systems at the same time it was disclosed to Microsoft and Linux. Why? BSD is ubiquitous among many network and systems devices forming a foundation upon which Internet infrastructure is built. The failure to notify these projects has put undue risk on various pieces of the Internet.
 When Meltdown-Spectre were finally disclosed, Microsoft and Linux were better prepared to deploy OS patches. After all, they had been working for months on the problem. Conversely, the BSD operating systems had only a week to prepare and are still catching up on patch integrations. Intel has even been ill prepared as they released microcode that was subsequently recalled then followed up with another release recently patching Spectre Variant 2 (CVE-2017-5715) at time of writing. Consequently, organizations likely continue to remain vulnerable.
This brings attention to the problems the community faces as it becomes increasingly obvious security embargoes do not scale to accommodate all possible stakeholders. There are no clear rules beyond an unenforceable agreement to disclose vulnerabilities, which fosters an environment where only some stakeholders are informed of newly discovered vulnerabilities.
In conclusion, there must be continuing discussions about these problems and their potential solutions. Failing to encourage continuing discussions will only maintain the status quo.
Discalimer
I have been a UNIX engineer for more than 20 years. Still, my experience is not generally within the security realm. This post describes a personal interpretation of problems regarding security embargoes particularly surrounding Meltdown-Spectre.
References
[1] https://en.wikipedia.org/wiki/Meltdown_(security_vulnerability)
[2] https://en.wikipedia.org/wiki/Spectre_(security_vulnerability)
[3] https://www.theguardian.com/technology/2018/jan/04/meltdown-spectre-worst-cpu-bugs-ever-found-affect-computers-intel-processors-security-flaw
[4] https://www.wsj.com/articles/intel-warned-chinese-companies-of-chip-flaws-before-u-s-government-1517157430
[5] https://security.googleblog.com/2018/01/todays-cpu-vulnerability-what-you-need.html
[6] https://www.theverge.com/2018/1/11/16878670/meltdown-spectre-disclosure-embargo-google-microsoft-linux
[7] https://twitter.com/aionescu/status/930412525111296000?lang=en
[8] https://thehackernews.com/2018/02/intel-processor-update.html
Windows 10, VirtualBox 5.2.0 w/ FreeBSD 12.0-CURRENT Guest
This post describes installation of a FreeBSD 12.0-CURRENT guest in VirtualBox 5.2.0 on Windows 10. The hardware is a HP Spectre x360 Convertible Touch 15″ laptop. Guests must be 64-bit and support bridged networking. Adapters used include:
- Intel Dual Band Wireless AC 8265
- Insignia NS-PU98505 USB 2.0 to Ethernet Adapter
Both attached to the same router on the same network, the Intel wirelessly and the Insignia via USB-to-Ethernet. Networking on the AC-8265 wireless only worked when attached as NAT. The Insignia worked as a bridged network.
The platform’s hardware virtualization was, oddly, disabled. Without the hardware virtualization, VirtualBox would not support 64-bit guests, only 32-bit guests. So, I enabled it.
Overview
This is an overview of the process. During my initial exercise, “Enable hardware virtualization” did not happen until it was discovered disabled. The primary scope of this post is to describe the overall tasks necessary to install FreeBSD as a guest and enable networking. It starts at creating a VM in VirtualBox. Also described will be challenges regarding networking the FreeBSD guest over a wireless bridge.
- Enable hardware virtualization if necessary
- Install VirtualBox
- USB extensions were also installed to facilitate mounting USB thumb drives
- Create new virtual
- Install FreeBSD 12.0-CURRENT disc1 ISO
- Setup wireless bridge
- Worked when attached as NAT
- Failed when attached as bridge
- Setup wired bridge
- Worked as bridge
- NAT not attempted
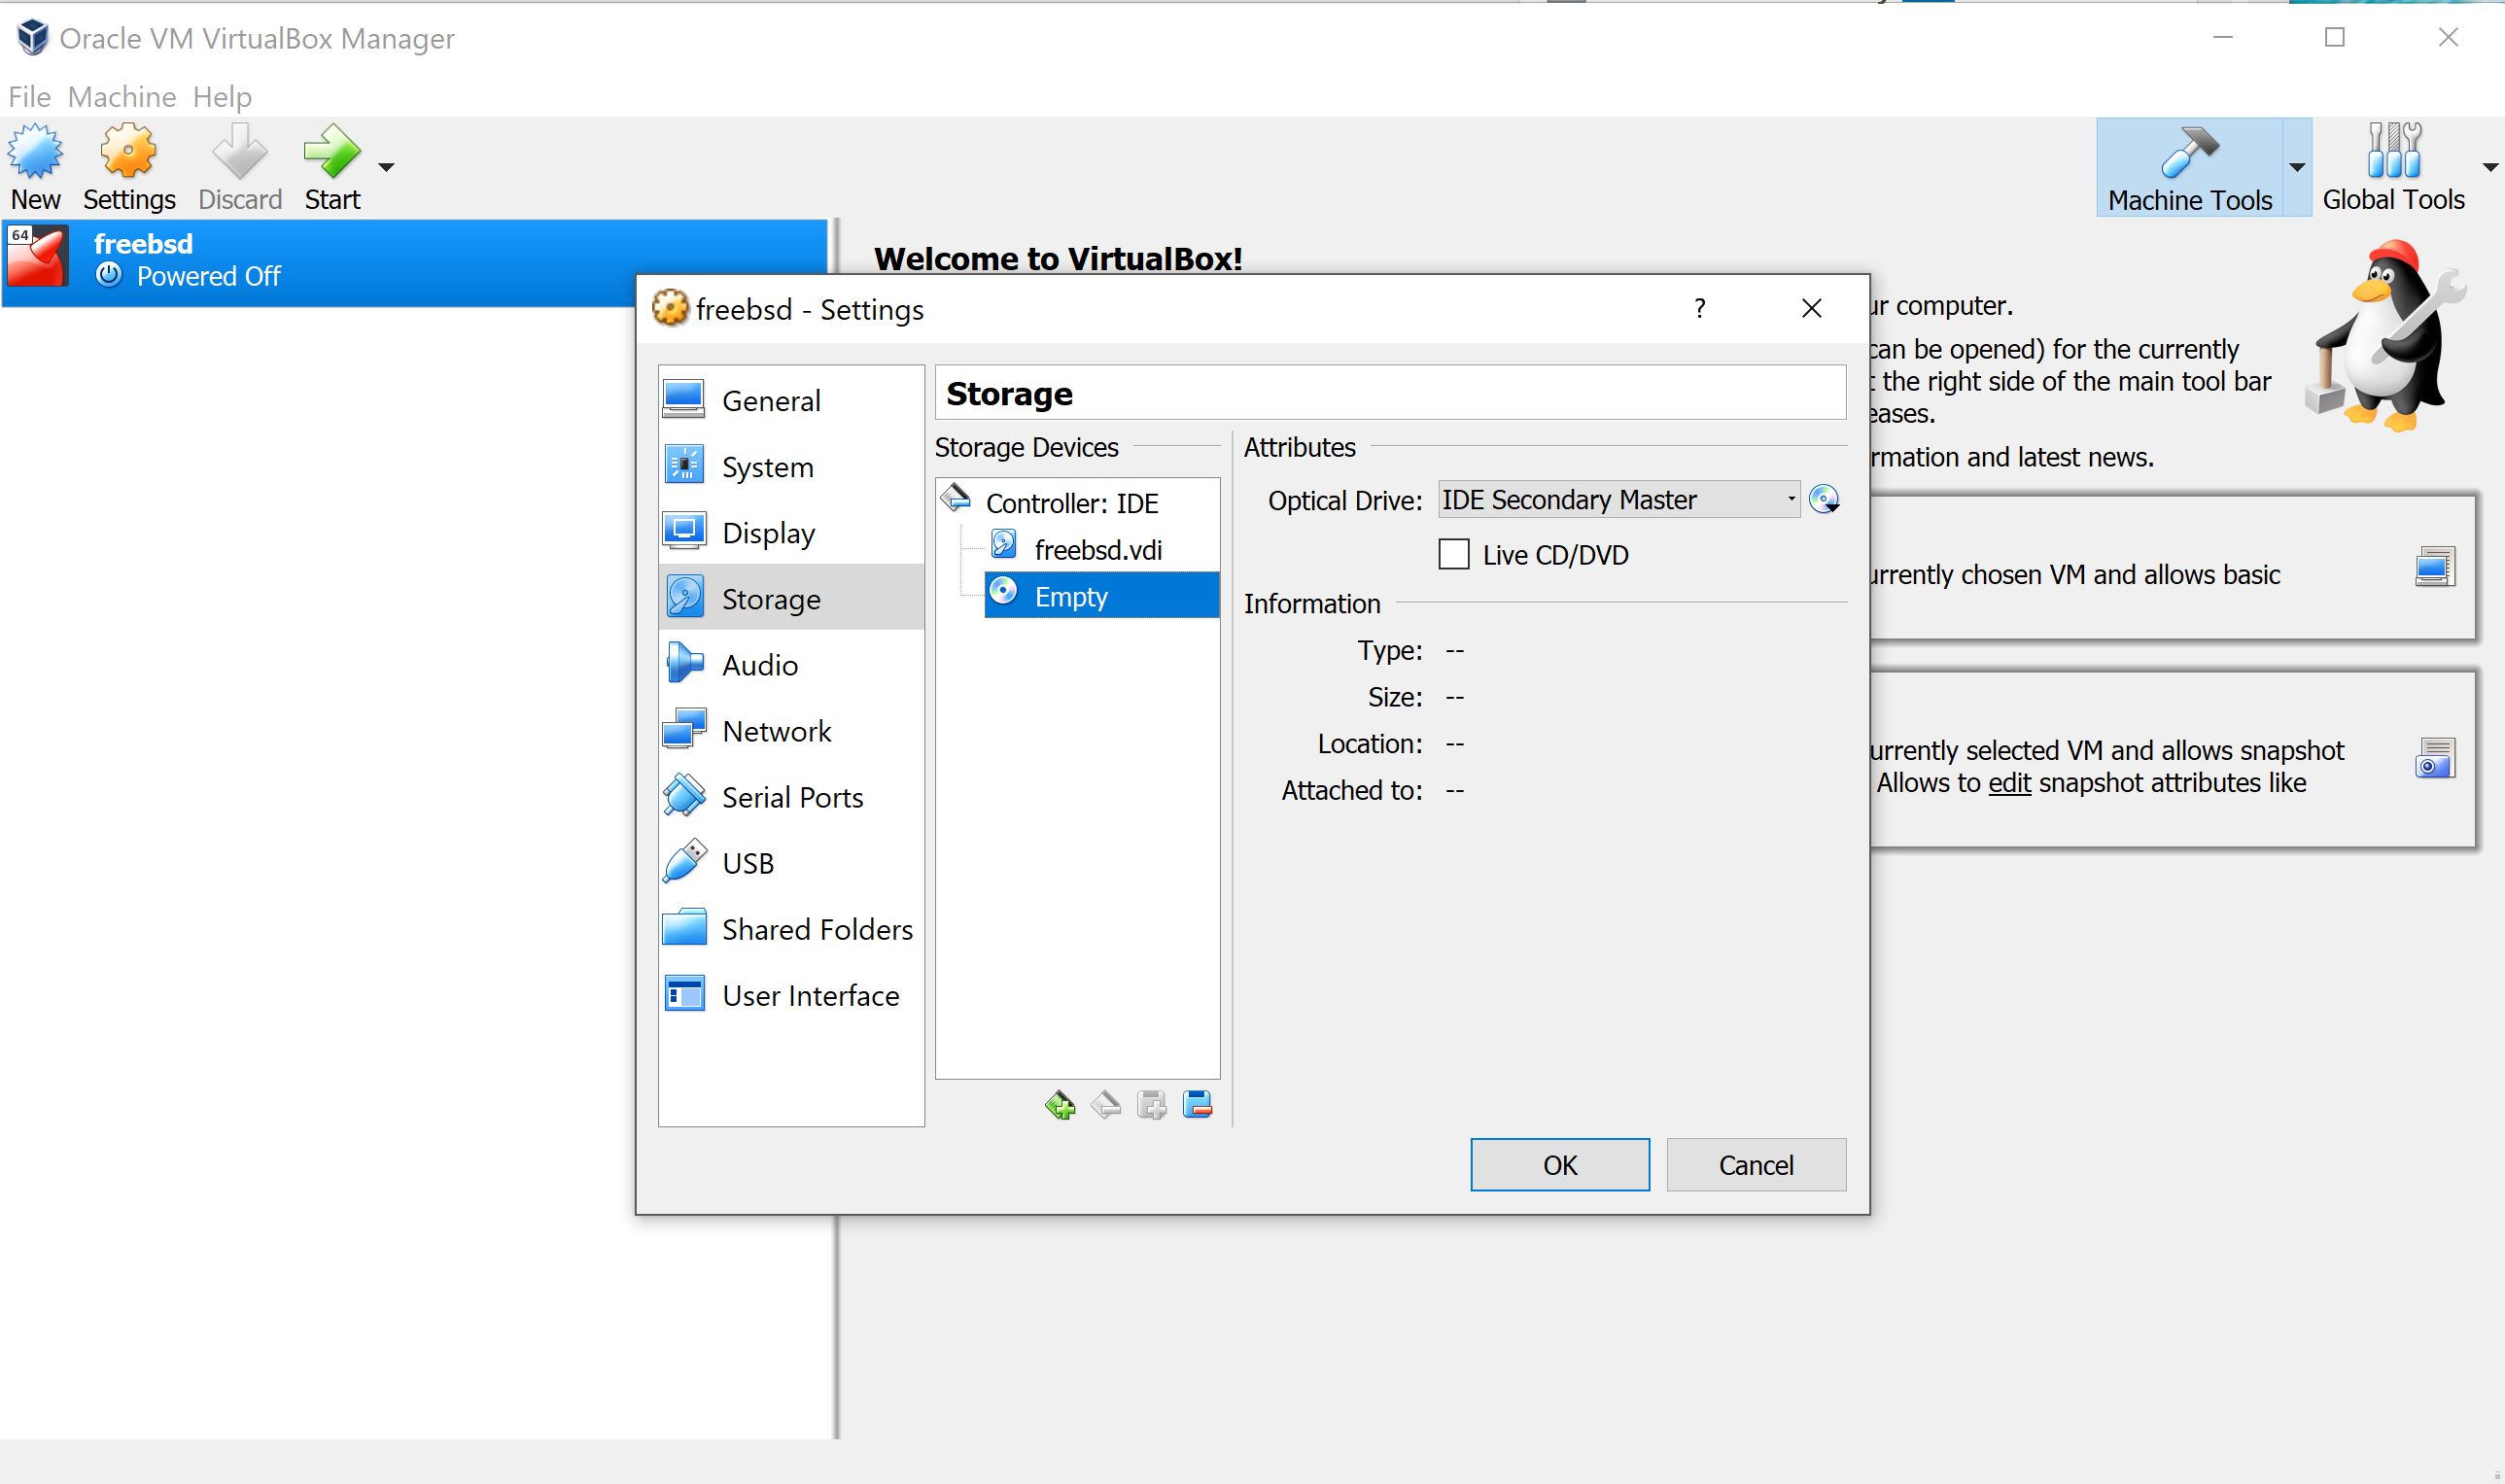
Creating the Virtual Machine
Open VirtualBox and on the main window click “New” on the menu bar and proceed thusly:

Typing “freebsd” in the name field automatically changes the others. Finally, click “Next”. In the following screens, set the memory, disk size, and other disk properties. The values here are mostly irrelevant, but for this exercise 4096MB RAM and 16GB disk were created accepting defaults for all other disk properties.
Install FreeBSD
Perform a normal start on the virtual machine and it will boot to the optical drive, the FreeBSD installation media like below. The interactive installation now starts. Proceed through the installation as you normally would and install the operating system.

And here is the install:

Setup & Test Wireless Bridge
These steps are completed on the Windows host. Open the “Network and Internet” settings panel and click “Change adapter settings”. This exercise included the following connections:
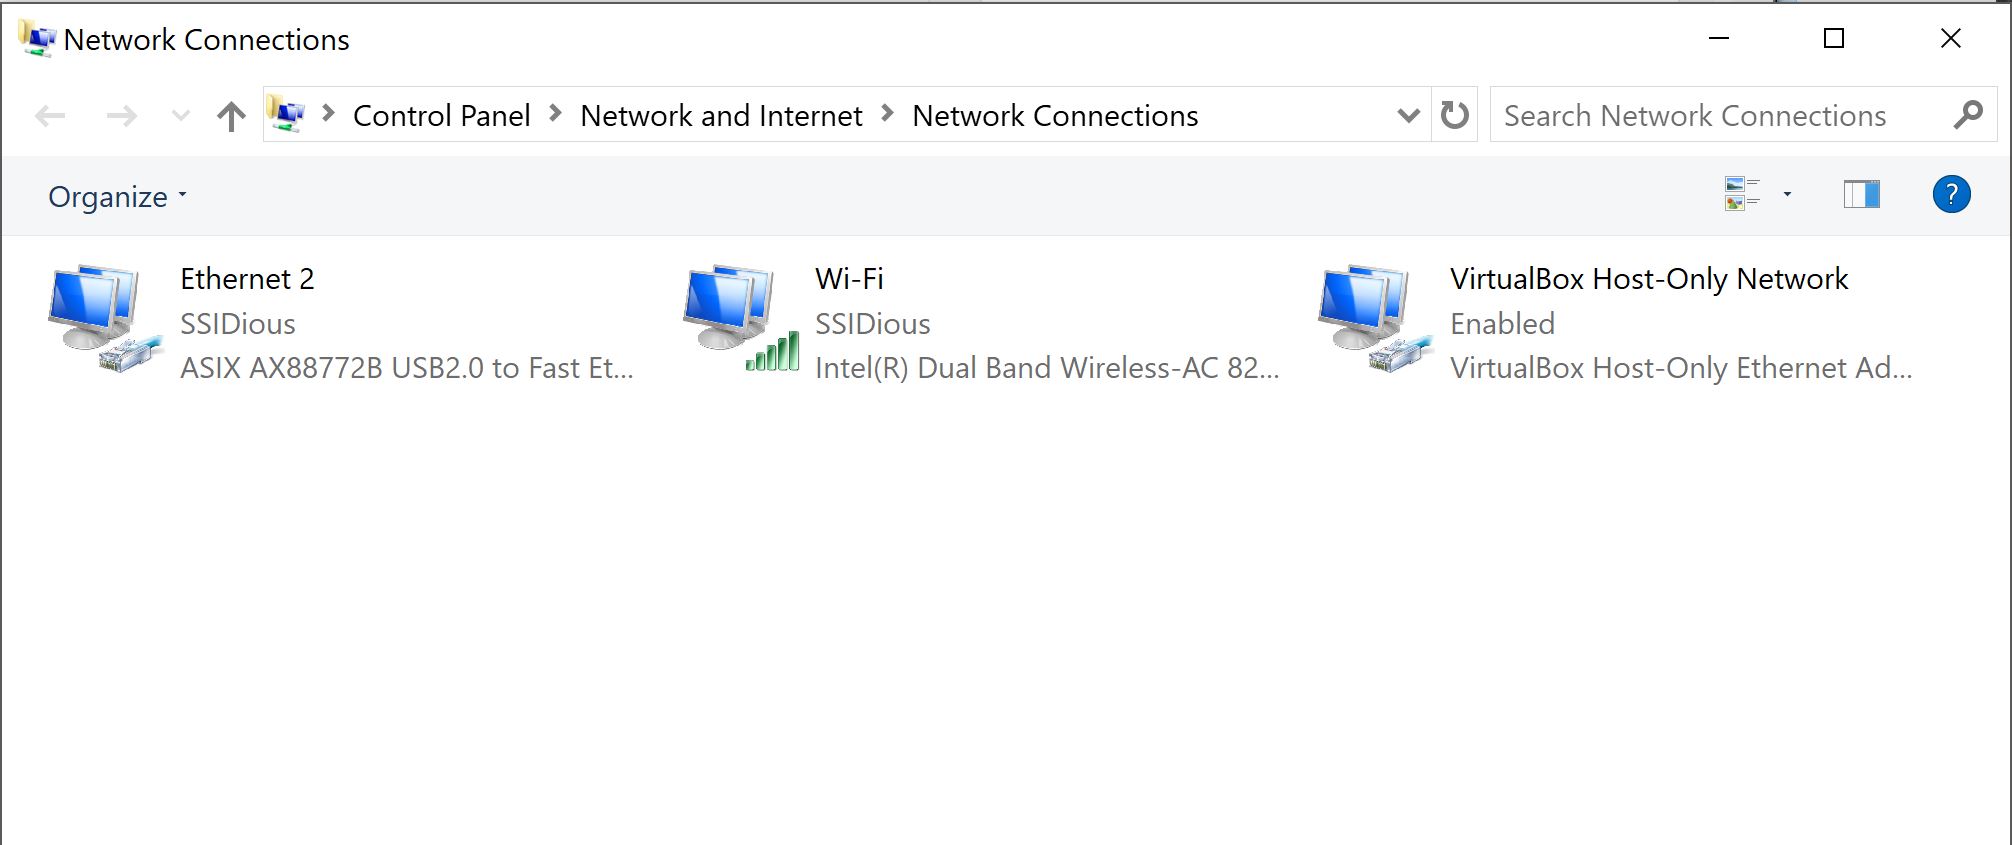
The Wi-Fi and VirtualBox Host-Only Networks are bridged by selecting both simultaneously, right clicking, and selecting “Bridge Connections”. A new connection showed up:

Configure the virtual machine’s network to attach as bridged network:

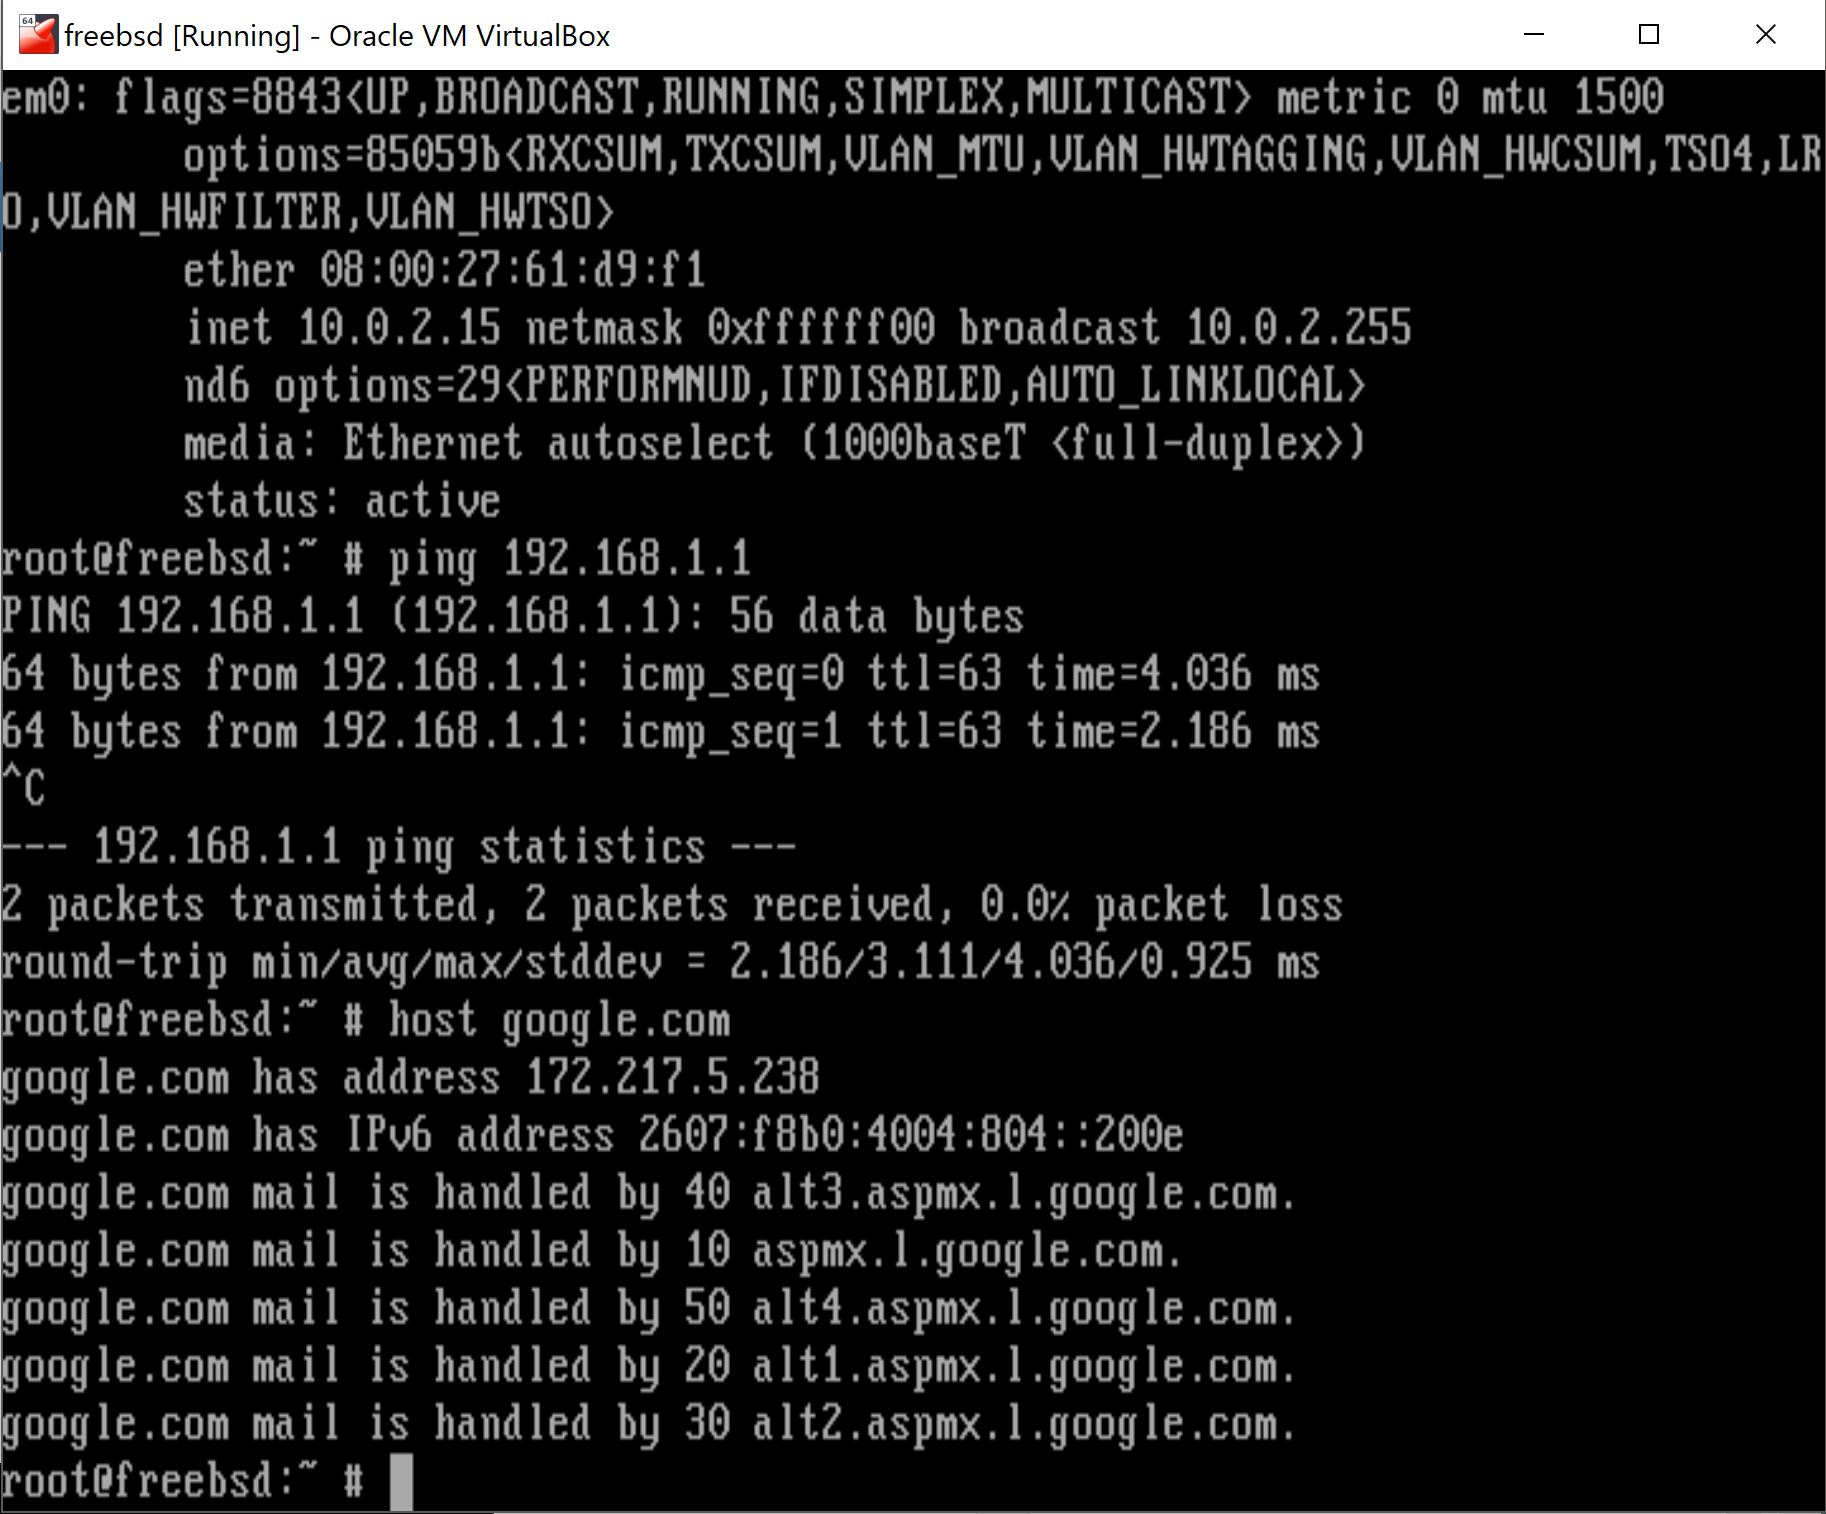
Observe the results below. Note em0 receives its IP address, but networking doesn’t seem to work as illustrated by the “Host is down” message when the defaultrouter is pinged. Additionally, host(1) fails to return the desired result…successful lookups.

Reconfiguring the virtual’s network to attach as NAT provides like the following:

Observe the results below. In direct contrast to those above. em0 is assigned an unknown IP address, but the defaulrouter responds to ping and lookups. Network is working at some level.
Setup & Test Wired Bridge
The wireless bridge is removed and a new bridge with the Insignia USB-to-Ethernet adapter is bridged with the VirtualBox Host-Only Network. Observe here:
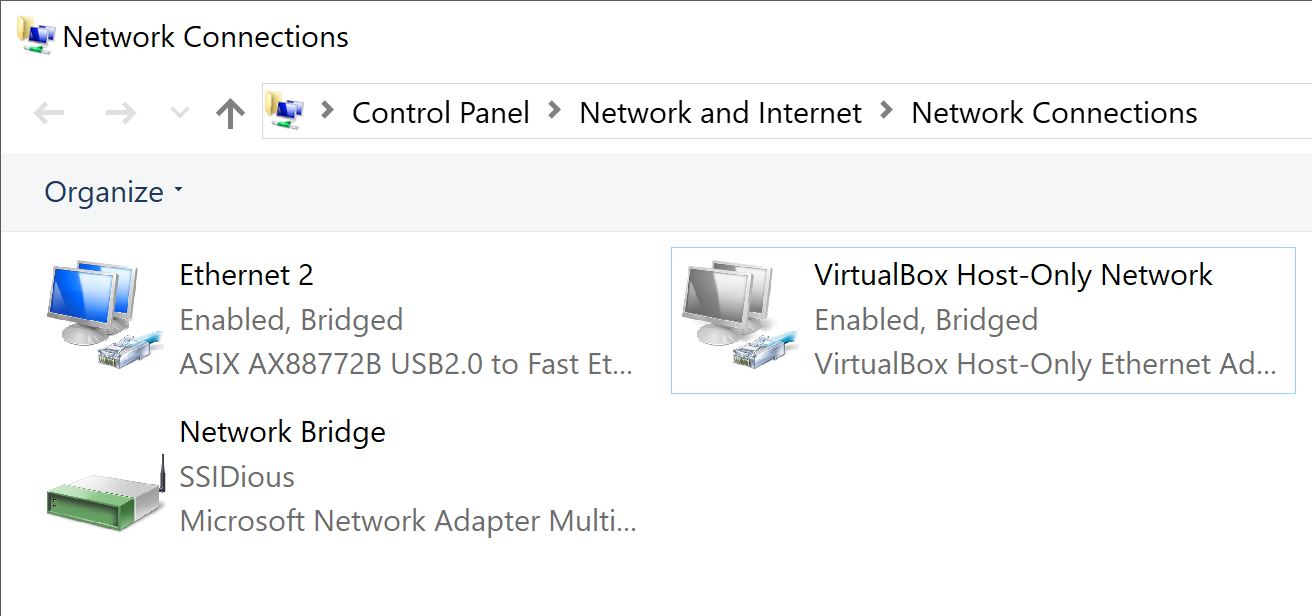
And the virtual is configured to use this bridge:
Observe the behavior below. em0 DHCP’d its IP address, was able to ping the defaultrouter, and performed a host lookup. Network via bridged network functioned as desired.

Conclusions
The reference URL below identifies at a high level the tasks that need to take place to enable guest networking in VirtualBox. It also states “Some wireless adapters don’t work”, which becomes the reason for not digging deeper into why the wireless adapters doesn’t work here. Instead, it becomes recommended to enable VirtualBox guest networking via a wired network bridge.
References
- https://stackoverflow.com/questions/31922055/bridged-networking-not-working-in-virtualbox-under-windows-10
Disclaimer
Data and information described on this blog are for informational purposes only. The author of this blog provides no warranty/guarantee, expressed or implied, that this data and information will function as described here. Readers are expected to exercise due diligence when researching, developing, and deploying techniques and methods for use within their environments.
Comments posted are the explicit opinions of the comment poster themselves and does not necessarily reflect the views and opinions of the author of this blog.
Internet Privacy: Who Do You Trust?
Who do you trust?
The rollback of the not yet effective USA FCC regulations enacted during the Obama administration poses an interesting dilemma. With the regulations set to take effect in 2017, user’s were/are still subject to whatever unregulated behavior an ISP chooses to exercise. In essence, all internet users are vulnerable to the whims of their ISP. Therefore, the rollback of these regulations does not materially impact Internet user behavior or activity at present.
These FCC regulations would have enabled users to trust that their ISPs, at least to a certain degree, are complying with privacy regulations and keeping much of the data generated by user’s activity private. While this may be an onerous assumption to make, the regulations allay fears of nefarious behavior by ISPs with user’s data.
Coupled with Vault 7 revelations and the FCC regulation rollback, many are concerned about their internet privacy and are clamoring for an answer. Predictably, paid VPN services are being discussed as a means to prevent snooping by user’s ISPs. This is an effective countermeasure achieving that specific goal, but is only a single tool out of many that should be deployed in parallel to minimize one’s exposure.
Deploying VPN services carries with it it’s own set of complications and considerations. Chief among these is trust as one is essentially changing the trust relationship with their ISP in favor of an another entity further along the line, but are prospective VPN services worthy of this? VPN providers have unfettered access to any traffic traversing their network. Additionally, they — and incidentally you — may be subject to laws and regulations of the prevailing authorities/jurisdiction, which may or may not be friendly to the end goal. Even if hosted outside the borders of the US, these services are subject to higher authorities. Can they be trusted? The answer is not clear and concise as it depends largely on the user’s desires.
The next logical leap is to consider self-hosting and operating one’s own VPN endpoint. This removes trust from all providers placing it with the user. The user controls the VPN, its configuration, and operation regardless of the jurisdiction within which it may be deployed. The user can control user registration and records, logging operations and scope, and log retention policies [generally within the constraints of the prevailing jurisdiction].
Even if one chooses to self host a VPN service — particularly within the US — consider the service on which the VPN is deployed may potentially be legally defined as an ISP. After all, they do provide a service on the Internet and can conceivably engage in the same behavior that is feared ISPs such as Verizon or Comcast will engage in. This invalidates the trust relationship with a broader definition of an ISP and/or common carrier. Obviously, the landscape changes with varying jurisdictions, whether US-based or international.
So, who do you trust?
Disk I/O Performance Under Filesystem Journaling on FreeBSD 10.3
Overview
This post describes disk I/O performance capabilities of the HP DL360p G8 in terms of filesystem journaling mechanisms on FreeBSD 10.3.
References
- https://people.freebsd.org/~kris/scaling/Help_my_system_is_slow.pdf
- http://docplayer.net/2690085-Hp-smart-array-controllers-and-basic-raid-performance-factors.html
- https://dom.as/2009/03/11/iostat/
Hardware
- Hewlett-Packard Proliant DL360p G8
- Dual 6-core CPU, E5-2640 @ 2.5GHz
- 16 x 8GB RDIMM @ 1333MHz (128GB)
- 8 x 2.5″ 500GB HDD, SATA
- SmartArray P420i 1GB Cache
Disk/RAID Configuration
All internal drives comprise a single RAID6 configuration with two logical volumes exposed to the OS. da0 is a 100GB volume while da1 is comprised of the remaining available disk space.
da0 is reserved for the OS and user-land. These experiments are executed on an empty da1 of approximately 2T in size.
Software
The following software was used in these experiments:
- FreeBSD 10.3
- iozone 3.457
- FreeBSD base iostat
- FreeBSD base gstat
Assumptions
- I/O is dominated by large sequential writes
- Random I/O is negligible
Methodology
Testing of the I/O subsystem was performed utilizing iozone for an application independent perspective. In the interest of minimizing the amount of time necessary to execute these experiments, we minimized the number of test cases to remove those of less value given the assumptions.
There were two primary tests; Writing of a 256GB file in conjunction with iozone’s -e and -o command-line options which causes each write to occur asynchronously w/ a full flush to disk. This is intended to be a worst-case scenario eliminating as much cache/buffer benefits and forcing I/O to be fully absorbed by the disks and disk controller. Secondly, testing was completed on a 75MB file while not utilizing the -e or -o options to iozone. This is intended to provide a best case scenario where the effects of OS level caching and buffering are realized.
A record size of 4096k was used as independent tests by a colleague showed this size providing the best performance. In the various different configurations, a different size may have provided better results, but they were not tested in an effort to minimize the number of test scenarios.
The tests were executed in a series of 3 samples averaging the results across all samples.
Test Results
Non-Journaled/Baseline
# tunefs -p /filesystem
tunefs: POSIX.1e ACLs: (-a)                                   disabled
tunefs: NFSv4 ACLs: (-N)                                      disabled
tunefs: MAC multilabel: (-l)                                  disabled
tunefs: soft updates: (-n)                                    enabled
tunefs: soft update journaling: (-j)                          disabled
tunefs: gjournal: (-J)                                        disabled
tunefs: trim: (-t)                                            disabled
tunefs: maximum blocks per file in a cylinder group: (-e)     4096
tunefs: average file size: (-f)                               16384
tunefs: average number of files in a directory: (-s)          64
tunefs: minimum percentage of free space: (-m)                8%
tunefs: space to hold for metadata blocks: (-k)               6408
tunefs: optimization preference: (-o)                         time
tunefs: volume label: (-L)
| Test | Command | Result |
|---|---|---|
| 1 | iozone -r 4096k -s 256g -R -o -e -t 1 -i 0 -i 1 -F /dump/BIGGY | Initial Write: 233 MB/sec Rewrite: 506 MB/sec Read: 531 MB/sec Re-read: 531 MB/sec |
| 2 | iozone -r 4096k -s 256g -R -t 1 -i 0 -i 1 -F /dump/BIGGY | Initial Write: 512 MB/sec Rewrite: 515 MB/sec Read: 536 MB/sec Re-read: 536 MB/sec |
| 3 | iozone -r 4096k -s 75m -R -o -e -t 1 -i 0 -i 1 -F /dump/BIGGY | Initial Write: 283 MB/sec Rewrite: 563 MB/sec Read: 3962 MB/sec Re-read: 4037 MB/sec |
| 4 | iozone -r 4096k -s 75m -R -t 1 -i 0 -i 1 -F /dump/BIGGY | Initial Write: 1859 MB/sec Rewrite: 2278 MB/sec Read: 4098 MB/sec Re-read: 4026 MB/sec |
| 5 | iozone -r 4096k -s 75m -R -t 6 -i 0 -F F1 F2 F3 F4 F5 F6 | Initial Write: 1353 MB/sec Rewrite: 4952 MB/sec |
| 6 | iozone -r 4096k -s 75m -R -t 7 -i 0 -F F1 F2 F3 F4 F5 F6 F7 | Initial Write: 1028 MB/sec Rewrite: 4042 MB/sec |
SU+J
# tunefs -p /filesystem
tunefs: POSIX.1e ACLs: (-a)                                   disabled
tunefs: NFSv4 ACLs: (-N)                                      disabled
tunefs: MAC multilabel: (-l)                                  disabled
tunefs: soft updates: (-n)                                    enabled
tunefs: soft update journaling: (-j)                          enabled
tunefs: gjournal: (-J)                                        disabled
tunefs: trim: (-t)                                            disabled
tunefs: maximum blocks per file in a cylinder group: (-e)     4096
tunefs: average file size: (-f)                               16384
tunefs: average number of files in a directory: (-s)          64
tunefs: minimum percentage of free space: (-m)                8%
tunefs: space to hold for metadata blocks: (-k)               6408
tunefs: optimization preference: (-o)                         time
tunefs: volume label: (-L)
| Test | Command | Result |
|---|---|---|
| 1 | iozone -r 4096k -s 256g -R -o -e -t 1 -i 0 -i 1 -F /dump/BIGGY | Initial Write: 236 MB/sec Rewrite: 506 MB/sec Read: 532 MB/sec Re-read: 533 MB/sec |
| 2 | iozone -r 4096k -s 256g -R -t 1 -i 0 -i 1 -F /dump/BIGGY | Initial Write: 508 MB/sec Rewrite: 514 MB/sec Read: 525 MB/sec Re-read: 525 MB/sec |
| 3 | iozone -r 4096k -s 75m -R -o -e -t 1 -i 0 -i 1 -F /dump/BIGGY | Initial Write: 280 MB/sec Rewrite: 577 MB/sec Read: 4263 MB/sec Re-read: 4196 MB/sec |
| 4 | iozone -r 4096k -s 75m -R -t 1 -i 0 -i 1 -F /dump/BIGGY | Initial Write: 1756 MB/sec Rewrite: 2227 MB/sec Read: 4201 MB/sec Re-read: 4319 MB/sec |
| 5 | iozone -r 4096k -s 75m -R -t 6 -i 0 -F F1 F2 F3 F4 F5 F6 | Initial Write: 1148 MB/sec Rewrite: 4998 MB/sec |
| 6 | iozone -r 4096k -s 75m -R -t 7 -i 0 -F F1 F2 F3 F4 F5 F6 F7 | Initial Write: 924 MB/sec Rewrite: 4551 MB/sec |
gjournal
# tunefs -p /filesystem
tunefs: POSIX.1e ACLs: (-a)                                   disabled
tunefs: NFSv4 ACLs: (-N)                                      disabled
tunefs: MAC multilabel: (-l)                                  disabled
tunefs: soft updates: (-n)                                    enabled
tunefs: soft update journaling: (-j)                          disabled
tunefs: gjournal: (-J)                                        enabled
tunefs: trim: (-t)                                            disabled
tunefs: maximum blocks per file in a cylinder group: (-e)     4096
tunefs: average file size: (-f)                               16384
tunefs: average number of files in a directory: (-s)          64
tunefs: minimum percentage of free space: (-m)                8%
tunefs: space to hold for metadata blocks: (-k)               6408
tunefs: optimization preference: (-o)                         time
tunefs: volume label: (-L)
| Test | Command | Result |
|---|---|---|
| 1 | iozone -r 4096k -s 256g -R -o -e -t 1 -i 0 -i 1 -F /dump/BIGGY | Initial Write: 176 MB/sec Rewrite: 176 MB/sec Read: 505 MB/sec Re-read: 510 MB/sec |
| 2 | iozone -r 4096k -s 256g -R -t 1 -i 0 -i 1 -F /dump/BIGGY | Initial Write: 181 MB/sec Rewrite: 184 MB/sec Read: 507 MB/sec Re-read: 509 MB/sec |
| 3 | iozone -r 4096k -s 75m -R -o -e -t 1 -i 0 -i 1 -F /dump/BIGGY | Initial Write: 401 MB/sec Rewrite: 492 MB/sec Read: 4467 MB/sec Re-read: 4087 MB/sec |
| 4 | iozone -r 4096k -s 75m -R -t 1 -i 0 -i 1 -F /dump/BIGGY | Initial Write: 1627 MB/sec Rewrite: 1415 MB/sec Read: 4838 MB/sec Re-read: 4879 MB/sec |
| 5 | iozone -r 4096k -s 75m -R -t 6 -i 0 -F F1 F2 F3 F4 F5 F6 | Initial Write: 943 MB/sec Rewrite: 872 MB/sec |
| 6 | iozone -r 4096k -s 75m -R -t 7 -i 0 -F F1 F2 F3 F4 F5 F6 F7 | Initial Write: 374 MB/sec Rewrite: 367 MB/sec |
Disclaimer
Data and information described on this blog are for informational purposes only. The author of this blog provides no warranty/guarantee, expressed or implied, that this data and information will function as described here. Readers are expected to exercise due diligence when researching, developing, and deploying techniques and methods for use within their environments.
Comments posted are the explicit opinions of the comment poster themselves and does not necessarily reflect the views and opinions of the author of this blog.
Integrating FreeBSD w/ FreeIPA/SSSD
It is February 2018 and almost 2 years have passed since this post was originally published. It has become this blog’s most popular post. Hopefully it has been insightful and useful to those who have read it. Since the initial phases of this project, there have been some new experiences and lessons learned. Therefore, I thought it was a good idea to update this post integrating those experiences. The updated post also integrates solutions to the problem described in the first comment. Please enjoy!
This post is best viewed within a desktop environment due to the expression of config files containing lines longer than smaller displays. Therefore, it is not particularly well suited for mobile browsing though reader view may alleviate some formatting issues.
Integrating FreeBSD w/ FreeIPA/SSSD
One of my more recent projects was to integrate FreeBSD into a Kerberos-secured authentication and authorization system based on the FreeIPA architecture. This post is an aggregate HOWTO with information sourced from a couple public (and one private) websites and a mailing list in addition to my own personal experience. The architecture and infrastructure of the FreeIPA system are beyond the scope of this post and will not be covered here. The focus is installing and configuring a client to use the FreeIPA-based authentication and authorization system.
Prerequisites and Requirements
- Client must have A & PTR records in DNS
- Client hostname must be set to it’s FQDN
- Client host table must include a matching FQDN/IP address record
- Configured and running NTP
- Client should have a so-called break-glass UNIX account
- Binary package repository w/ packages supporting FreeIPA
- A Kerberos keytab for the client
Failure to meet requirements 1-3 generally introduces latency from the perspective of the client particularly when logging in remotely with ssh for example. NTP should also be configured and running.
The break-glass account is a local, UNIX-based account on the client filtered via SSSD policy/config. It will not use SSSD for authentication and it can be arbitrary in nature, so long as it is filtered. This is useful when remote access is lost due to service outage or similar. It is also useful to open a session to this user while this process is executed.
Client services won’t start and the client will fail authenticate and authorization against FreeIPA infrastructure without the proper software installed. Custom options are required to support FreeIPA. This can be done via Ports or packages; Described below is the latter.
Finally, the host keytab file must be generated in the FreeIPA infrastructure and securely copied to the client. The keytab facilitates system authentication via Kerberos.
Overview
The goal is to integrate FreeBSD into the FreeIPA architecture to provide services to ssh and sudo. No other authentication or authorization mechanisms were tested. Additionally, this post is constructed from notes and memory. Hopefully nothing has been missed and everything is accurate, but it is possible this is not the case. Help me keep this accurate, if necessary.
There are two high level tasks to be completed; Generate the binary package repository with FreeIPA-enabled packages and client installation/configuration. The binary package repository only needs to be done once. Ongoing maintenance of binary repositories is necessary to make newer versions available when necessary.
Building The Binary Package Repository
Execute this process to build a binary package repository containing the necessary packages w/ custom options enabled. It is assumed a pre-existing Poudriere build and distribution environment is available.
$jail_id is the Poudriere jail ID within which the repo is to be built
$portstree_id is the Poudrere Ports tree ID on which to execute the build
$ cat >> $jail_id-make.conf <<-EOF
WITH_GSSAPI="YES"
WANT_OPENLDAP_SASL="YES"
KRB5_IMPL="mit"
EOF
$ cat > pkg_list <<EOF
security/cyrus-sasl2-gssapi
security/sssd
security/sudo
security/openssh-portable
security/pam_mkhomedir
EOF
$ poudriere options -c -n -p $portstree_id security/sssd security/sudo security/openssh-portable security/cyrus-sasl-gssapi
$ poudriere bulk -f pkg_list -j $jail_id -p $portstree_id
The kerberos implementation deployed in IPA dictates the kerberos implementation software is built to support. MIT kerberos is the predominant implementation in use within the US. The above configuration supports MIT kerberos.
Step 3 presents dialog boxes populated with various radio options. A null radio is a deselected option while options denoted by an “X” are selected. Configure options for each of the packages as described here:
security/sssd: Enable SMB (Builds and installs the IPA provider)
security/sudo: Enable SSSD backend
security/openssh-portable: Enable MIT Kerberos and KERB_GSSAPI
KERB_GSSAPI can cause the openssh-portable port to be marked as BROKEN because it’s dependent on an unmaintained patch, which has been updated occasionally by the Debian project. This generally appears to be the case when the port is updated to a newer version.
Installing/Configuring The Client
FreeIPA includes a client installer for Linux that is unavailable for FreeBSD. Rumors suggest porting it to FreeBSD is non-trivial. It was not done for this project. It would simplify this process significantly however.
The procedure below includes commands executed on the command line as well as descriptions of operations needed to be completed such as editing or creating a file. Several commands and/or files include hostnames inherently describing a dependency on DNS. Open a standby shell in order to maintain access to the system during this operation as access to the system can be halted in executing it.
$cblrserver is the hostname or IP of the server from which to grab content. This is simply an HTTP accessible resource.
$ipaserver is the hostname or IP of the IPA server with which to communicate
$domain is the domain of the target host
$hostname is the fully qualified hostname
1) Configure the binary package repository and install the required packages:
$ cat > /etc/pkg/ipa.conf <<-EOF
ipa: {
  url: "http://$cblrserver/cobbler/repo_mirror/freebsd-10_3-amd64-pkgs-ipa",
  mirror_type: "none",
  enabled: yes
}
EOF
$ pkg update -f
$ mkdir -p /etc/ipa /usr/compat/linux/proc /var/log/sssd /var/run/sss/private /var/db/sss
$ pkg install -y -r ipa cyrus-sasl-gssapi sssd sudo openssh-portable pam_mkhomedir
2) Configure Kerberos and SSSD
$ cat /etc/krb5.conf
[libdefaults]
  default_realm = EXAMPLE.COM
  default_keytab_name = FILE:/etc/krb5.keytab
  default_tkt_enctypes = aes256-cts des-cbc-crc aes128-cts arcfour-hmac
  default_tgs_enctypes = aes256-cts des-cbc-crc aes128-cts arcfour-hmac
  dns_lookup_realm = false
  dns_lookup_kdc = false
  rdns = false
  ticket_lifetime = 24h
  forwardable = yes

[realms]
  EXAMPLE.COM = {
    kdc = $ipaserver:88
    master_kdc = $ipaserver:88
    admin_server = $ipaserver:749
    default_domain = $domain
    pkinit_anchors = FILE:/etc/ipa/ca.crt
  }

[domain_realm]
  .example.com = EXAMPLE.COM

[logging]
  kdc = FILE:/var/log/krb5/krb5kdc.log
  admin_server = FILE:/var/log/krb5/kadmin.log
  kadmin_local = FILE:/var/log/krb5/kadmin_local.log
  default = FILE:/var/log/krb5/krb5lib.log

[edit]
$
$
$ cat /usr/local/etc/sssd/sssd.conf
[domain/$domain]
#debug_level = 9
cache_credentials = True
krb5_store_password_if_offline = True
krb5_realm = EXAMPLE.COM
ipa_domain = $domain
id_provider = ipa
auth_provider = ipa
access_provider = ipa
ipa_hostname = $hostname
chpass_provider = ipa
ipa_server = _srv_, $ipaserver
ldap_tls_cacert = /etc/ipa/ca.crt
krb5_keytab = /etc/krb5.keytab

[sssd]
services = nss, pam, ssh, sudo
config_file_version = 2
domains = $domain

[nss]
filter_users = root,smash
homedir_substring = /home

[pam]

[sudo]

[ssh]
$
$
chpass_provider is irrelevant to FreeBSD because the IPA tools are required and currently unavailable to FreeBSD. This service can be provided to users on separate infrastructure using Linux instead. Also note filter_users includes root in addition to the break-glass account.
3) Configure NSS similarly to the below:
$ egrep "sss|netgroup" /etc/nsswitch.conf
group: files sss
passwd: files sss
sudoers: files sss
netgroup: files
NSS interrogates the data source in the order in which it’s listed. The above policy first validates authentication/authorization for local UNIX accounts before SSSD. NSS validates via SSSD when the invoking user is not a local UNIX user.
4) Configure and mount the linproc filesystem
# echo "linproc /usr/compat/linux/proc linprocfs rw 0 0" >> /etc/fstab
# mount -a
5) Configure rc.conf and domainname
$ cat /etc/rc.conf
rpcbind_enable=“YES”
sshd_enable=“NO”
openssh_enable="YES"
ntpd_enable="YES"
nisdomainname=“example.com”
sssd_enable="YES"
$ sudo domainname example.com
6) Configure openssh-portable similarly to:
$ grep GSSAPI /usr/local/etc/ssh/sshd_config
GSSAPIAuthentication yes
GSSAPICleanupCredentials yes
7) Download the CA certificate required by kerberos
$ wget -O /etc/ipa/ca.crt http://$ipaserver/$uri/ca.crt
8) Configure PAM according to these configs:
$ cat /etc/pam.d/sshd
# auth
auth sufficient pam_opie.so no_warn no_fake_prompts
auth requisite pam_opieaccess.so no_warn allow_local
auth sufficient /usr/local/lib/pam_sss.so use_first_pass ignore_unknown_user
auth required pam_unix.so no_warn try_first_pass

# account
account required pam_nologin.so
account sufficient /usr/local/lib/pam_sss.so ignore_unknown_user
account required pam_login_access.so
account required pam_unix.so

# session
session required pam_lastlog.so no_fail
session required /usr/local/lib/pam_mkhomedir.so

# password
password sufficient /usr/local/lib/pam_sss.so
password required pam_unix.so no_warn try_first_pass
$
$
$ cat /etc/pam.d/system
# auth
auth sufficient pam_opie.so no_warn no_fake_prompts
auth requisite pam_opieaccess.so no_warn allow_local
auth sufficient /usr/local/lib/pam_sss.so use_first_pass
auth required pam_unix.so no_warn try_first_pass nullok

# account
account sufficient /usr/local/lib/pam_sss.so ignore_unknown_user
account required pam_login_access.so
account required pam_unix.so

# session
session required pam_lastlog.so no_fail
session required /usr/local/lib/pam_mkhomedir.so

# password
password sufficient /usr/local/lib/pam_sss.so use_first_pass
password required pam_unix.so no_warn try_first_pass
It may be desirable to symlink /etc/pam.d/sudo to /etc/pam.d/system or /etc/pam.d/su depending on the desired behavior.
9) Create /etc/netgroup with the following script. Set this script to run via cron to rebuild the file periodically.
This script is ported from one of the references to update /etc/netgroup locally on FreeBSD hosts. LDAPSRV is the hostname or IP of the LDAP server to query. This is generally the same as the IPA servers. Executing this script via cron will keep the file updated.
Note the patch below may be useful if /etc/netgroup tends to be large file. If LDAP returns netgroups in response to a query, sudo calls innetgr(), which subsequently loads and iterates the file to determine if the host belongs to a netgroup in which the invoking user is a member. NSS’ netgroup database provides the data source for innetgr() which supports neither sss nor ldap. The time required to iterate the file is proportional to it’s size and can introduce severe performance degradation. The patch below — when applied to the script — ensures only relevant entries exist thus reducing the file’s size. The patch assumes the script is called mknetgroup.sh.
FreeBSD PR 226119 is open as a feature request to implement a LDAP data source for NSS’ netgroup database.
diff --git a/mknetgroup.sh b/mknetgroup.sh
index 48eda74..5ba4e6d 100755
--- a/mknetgroup.sh
+++ b/mknetgroup.sh
@@ -7,6 +7,7 @@

 PATH=/usr/local/bin:/usr/bin:/bin:/usr/local/sbin:/usr/sbin:/sbin
 LDAPSRV=__IPASERVER
+HOSTNAME=$(hostname -s)
 export PATH

 progrname=$(basename $0)
@@ -46,7 +47,9 @@ ldapsearch -LLLx -H ldap://${LDAPSRV} \
     elif [ "$key" = "nisNetgroupTriple" ]; then
         host=${value%%,cn*}
         host=${host##fqdn=}
-        members="$members $host"
+        case $host in
+            *${HOSTNAME}*) members="$members $host" ;;
+        esac
     fi
 done
#!/bin/sh
#
# Construct a netgroup file from LDAP hostgroup definitions.
# This is a hack for FreeBSD IPA clients because they can't get netgroup
# data through LDAP or sssd backends (lacking nsswitch/nsdb support).
#

PATH=/usr/local/bin:/usr/bin:/bin:/usr/local/sbin:/usr/sbin:/sbin
LDAPSRV=ipa.example.com
export PATH

progname=$(basename $0)
tmpf=$(mktemp)

trap "rm -f $tmpf" EXIT

ldapsearch -LLLx -H ldap://${LDAPSRV} \
  -b 'dc=example,dc=com' \
  '(objectClass=nisNetgroup)' cn nisNetgroupTriple \
| while read line; do
# new line between records; this means a record ended.
if [ "$line" = "" ]; then
  # output netgroup line if we have members.
  if [ "$members" != "" ]; then
    echo "$groupname \\" >>$tmpf
    for host in $members; do
      echo "$host \\" >>$tmpf
    done
    echo "" >>$tmpf
  fi

# reset data
groupname=""
members=""
continue
fi

# parse "key: value" from LDAP
key=${line%%: *}
value=${line##*: }

if [ "$key" = "dn" ]; then
  continue
elif [ "$key" = "cn" ]; then
  groupname=$value
elif [ "$key" = "$netgroupobj" ]; then
  host=${value%%,cn*}
  host=${host##fqdn=}
  members="$members $host"
fi
done

if [ ! -s "$tmpf" ]; then
  echo "$progname: refusing to install an empty file, bailing" >&2
  exit 1
fi

install -m 0644 -o root -g wheel $tmpf /etc/netgroup
rc=$?
if [ $rc -ne 0 ]; then
  echo "$progname: error installing /etc/netgroup (rc = $rc)" >&2
  exit 2
fi

exit 0
10) Restart services or reboot
$ sudo service sssd start
$ sudo service sshd stop && sudo service openssh start
Upon completion, the target host has been configured to communicate with the authentication and authorization frameworks. Reboot is not required, but certainly recommended.
References
Disclaimer
Data and information described on this blog are for informational purposes only. The author of this blog provides no warranty/guarantee, expressed or implied, that this data and information will function as described here. Readers are expected to exercise due diligence when researching, developing, and deploying techniques and methods for use within their environments.
Comments posted are the explicit opinions of the comment poster themselves and does not necessarily reflect the views and opinions of the author of this blog.
Verisign Announces vBSDcon 2015
Verisign has recently announced the dates for a second vBSDcon to occur September 11 – 13, 2015 in Reston, VA. vBSDcon is technical, BSD-based conference for users, developers, engineers, and innovators working with BSD-based operating systems such as FreeBSD, OpenBSD, NetBSD, and more…
The program is being expanded in 2015 to colocate a FreeBSD Developer’s Summit the day preceding main conference activities. Additionally, space will be allotted for use of Hacker Lounges and Doc Sprints. These self-moderated sessions are open time during the off hours of the conference for use by members of all the BSD communities to collaborate and work on varying projects.
The inaugural vBSDcon was a resounding success and included speakers from the FreeBSD and OpenBSD communities. It also featured prestigious sponsors including The FreeBSD Foundation, who is returning as a Developer Summit sponsor in 2015, RootBSD, Daemon Security, iXsystems, HP, Juniper, and CDW.
![]()
Starting A Daemon via daemon(8) in FreeBSD
Starting A Daemon via daemon(8) in FreeBSD
Daemonizing an application that must persist across reboots while including native process management capability is easily accomplished by combining the functions of rc(8) scripts and commands with daemon(8), a utility that detaches itself from the controlling terminal and executing a program. For example, a service written in Python implementing an HTTP API front-end.
Combing these two utilities enables automated process initialization during system boot and provides the ability to stop, start, and restart services manually using either the rc(8) script or service(8). For example:
/usr/local/etc/rc.d/httpapi start
or
service httpapi start

Create an rc(8) script in /usr/local/etc/rc.d with a name descriptive of the application. httpapi is a descriptive name in this case. Writing the rc(8) script is covered extensively well in the “Practical rc.d scripting in BSD” article on FreeBSD.org and is a very good read. Those reading this blog are encouraged to go read that article though, for expediency, a basic implementation may look very similar to:
#!/bin/sh# REQUIRE: LOGIN
. /etc/rc.subr
name=httpapi
rcvar=httpapi_enable
command=/usr/local/bin/httpapi
command_interpreter=python
httpapi_user=httpapi
start_cmd=”/usr/sbin/daemon -u $httpapi_user $command”load_rc_config $name
run_rc_command “$1”
The value of the key rcvar is used to automate the startup of the daemon at system boot within /etc/rc.conf. Append a line to the file containing a combination of this value as key a key with a boolean “YES” or “NO” similarly to:
echo "httpapi_enable=\"YES\"" >> /etc/rc.conf
Disclaimer
Data and information described on this blog are for informational purposes only. The author of this blog provides no warranty/guarantee, expressed or implied, that this data and information will function as described here. Readers are expected to exercise due diligence when researching, developing, and deploying techniques and methods for use within their environments.
Comments posted are the explicit opinions of the comment poster themselves and does not necessarily reflect the views and opinions of the author of this blog.
QEMU: Convert non-Sparse Image to qcow/qcow2 Sparse Image
Convert non-Sparse Image to qcow/qcow2 Sparse Image
While this is not always ideal, I’ve found it handy to build qcow/qcow2 images (for use in OpenStack) by converting a vmdk on FreeBSD. Often times, VMWare images are created with thick provisioning meaning that the disk consumed on the hypervisor will equal the disk allocated to the virtual though there may be an overwhelming quantity of contiguous zero bytes. For example, creating a thick provisioned disk for a VM of, say, 20GB will result in approximately 20GB being consumed on the hypervisor’s disk even though, perhaps, only 50% of that is in use. The remaining 50% will be zero’d bytes and, while technically empty, still consuming space.
VMDK’s can be converted to qcow/qcow2 using qemu-img(1) similarly to:
qemu-img convert -f vmdk -O qcow2 freebsd-10.0.0-amd64.vmdk freebsd-10.0.0-amd64.qcow2
Excellent, we now have qcow2 image suitable for use within OpenStack. However, the size of this file is likely to be the same or very similar to the original vmdk. This can be taken a step further to significantly reduce the amount of space the file consumes using a sparse file.
Using the ‘-S’ command line option enables us to ensure the output file becomes sparse, therefore freeing the space it consumed with a series of zero bytes. This option, while it defaults to 4k, accepts an argument* (size) permitting users to specify the quantity of bytes which must be zeros before it can be that portion is made “sparse”.
The resulting command line is very similar to the above, except that it includes ‘-S’ and the argument, for example:
qemu-img convert -f vmdk -O qcow2 -S 4k freebsd-10.0.0-amd64.vmdk freebsd-10.0.0-amd64.qcow2
* NOTE: if installed from FreeBSD Ports, the argument was required despite having a default defined.
Disclaimer
Data and information described on this blog are for informational purposes only. The author of this blog provides no warranty/guarantee, expressed or implied, that this data and information will function as described here. Readers are expected to exercise due diligence when researching, developing, and deploying techniques and methods for use within their environments.
Comments posted are the explicit opinions of the comment poster themselves and does not necessarily reflect the views and opinions of the author of this blog.
